Saturday 18 December 2010

Happy Christmas!

Christmas is almost here now!  Just time to post a last minute card.  I wanted to use the sheet music for "In The Bleak Midwinter" as the card is for someone who loves this particular Carol.  However, I did find it difficult to design around it and I'm still not sure if it really works?  


I tried adding a sentiment but it seemed to ruin the whole balance and so I've kept it simple with just the main pyramage image "Girl with Muff" and the flowers. Oh and some diamond stickle to add a bit of pizzazz.

Pyramage image "Girl with Muff" and music sheet background both from Printable Heaven. Flowers from Wild Orchid Crafts.

I'm entering this for the following Challenges:
Creative Stamp Friends - Challenge 14 - Traditional Christmas Colors
Stampin' For the Weekend - Challenge 53 - Christmas

A Spoon Full of Sugar - Challenge 133 - Christmas Card


Oh well, off to get plenty of sleep and my antibiotics.  Hope to bring in the new year healthy!!!

Happy Christmas to you all!!!  

Wishing you and your families good health and a very happy and peaceful holiday!

All the best
Hugs
Sue xxxx

Friday 3 December 2010

Travel the World - India

Hi,

I have been making so many Christmas Cards, it was nice to take a break for the Sir Stampalot - December Challenge - Travel The World.  One of the many places I have always wanted to visit is India, especially the Palaces of Rajasthan. At the moment it seems a very distant dream .... but I thought I would make an exotic looking card, something which I have wanted to do for a while, since I got my Moroccan XCut Punch! The stamp is Clear Magic: "Indian Dreams" which you can buy at Handy Hippo Website. You also get the Wishes stamp along with other images and borders etc.


The gems were 2mm and 3mm (quite tiny). They are Anita's Gemstone Wheels from Crafty Devils Papercraft. I used Gem Tac glue from Crystal-Beads and also from Crystal-Beads, a Rhinestone Picker or Jewel Setter, which is a pack with two sticky ended sticks for placing gems. You can use the plain end of the other one to nudge gem or bead into place. I have to say this has been a really useful tool and I use it a lot for adding beads and stones. The Gem Tac glue is also really good for adding glitter as it is quite runny but very tacky. It was quite tricky getting the punching centred. All I can say is practice on rough paper and do corners first, then centre.

Colouring for Stamp: 
Promarkers 
Elephant: Cool Grey 3 and Cool Grey 4
Elephant's Coat & Decorations: Magenta, Yellow, Grass

Ingredients:
Black 5" card blank from Handy Hippo
Hot Pink paper from Milton Christmas Paper Stack from Handy Hippo
Moroccan XCut Punch from Crafty Devil's Papercraft
"Indian Dreams" Clear Magic stamp from Handy Hippo
Jewels: Anita's Gemstone Wheel 2mm and 3mm gems - yellow from Crafty Devil's Papercraft
Gem Positioner from Crystal-Beads
Beacon Gem Tac Glue from Crystal-Beads


Afterthought

Finally, I can't resist incorporating a little of my love of genealogy into my website:

Below is a wonderful photograph of my gt gt grandparents! The reverse side has a Christmas message, and is dated Christmas 1907 - so it was obviously a photograph used for Christmas, a bit like the Royals do nowadays LOL. The photo may be a little creased and stained but I really treasure it as an insight into my ancestors. Isn't it lovely to be able to see what they looked like and how they dressed?!!!


Tuesday 16 November 2010

Happy Birthday!

Hi, I've not posted for a while as I have had a flair up of stomach problem but I am feeling a lot better now.  I have made a card for my mum who is 80 at the end of the month. I can't believe she is 80, she certainly doesn't look her age and she is very young at heart!  So Happy Birthday, mum! (will show her this on her birthday after I have given her the card).  The stamp is a lovely one called "Winter Millie" by Wild Rose Studio's Milton & Co. range available from Handy Hippo website.


My mum doesn't like overly fussy cards, so I decided to keep it quite simple. I think (hope) she will love Millie and I know she loves purple.  The background paper is from Wild Rose Studio Floral. I  Used Martha Stewart doily lace edge punch and made Happy Birthday and 80 banners on computer. The leaves were xcut punches, maple and beech, using silver paper and some green from 'floral' stack.

Winter Millie (close up)


Colouring for Millie:

Dress, Hat, Mittens, Bow and Flowers:  Copics V12, V15 
Skin/Fur:  Copics E31, E33 and E35.
Plantpot: Promarkers Cool Grey 2 and 4
Fur Trims: Diamond Stickle

Challenges entered:

Lili of The Valley - Challenge  No. 73 (blog hop) - Anything Goes
Cute Card Thursday - Challenge No 138 - Anything Goes
Dutch Dare Card Challenge No.  90 - Clean & Simple

I had a look at a lot of different cards on the challenges over the weekend with my family and was surprised how we all liked different ones.  What one person loved, another wasn't keen on, vice versa etc. Also last month I made a card and didn't like it and was about to throw it in the bin. My daughter was flabbergasted and said she absolutely loved it! It made me think - beauty really is in the eye of the beholder LOL. 

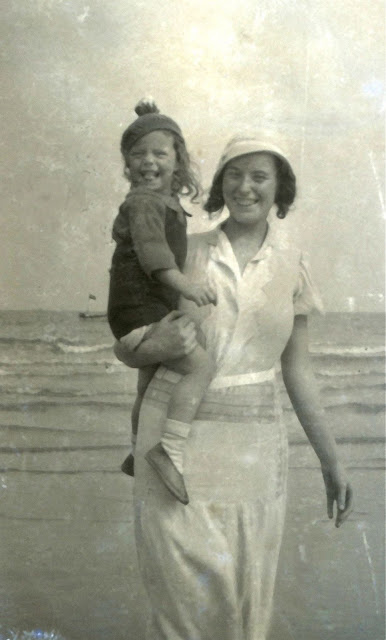
Final word goes to my mum: - below is a lovely photo of her aged about six, with her mother at the seaside. It would have been about 1936. I love that she looks so happy!!!

Happy 80th Birthday Mum!!!


Wednesday 3 November 2010

'Twas The Night Before Christmas

Is it just me or does time seem to be flying by in the run up to Christmas!  I seem to have had a busy week - appointments, writing letters and filling in forms.  I've just about had time to do this card for the Lili of The Valley Challenge 71 - Sketch by Bev.


I wanted to do a traditional Christmas Card and use this particular stamp which is "Night Before Christmas" by LOTV.  I found the image was a bit squashed using the sketch the normal way, so rotated it which I think looks better. 
  

(Promarkers by colour, Copics by no.)

Bunny: Vanilla, R20
Nightsuit: Pastel Blue, spots - Aquamarker Frost Blue, 
 Nightsuit buttons & tie G85
Candle dish: G85
Candle holder: Pastel blue
Candle: R46
Flame: Canary and Bright Orange
Stocking: R46, G85 and Pastel Blue
Candle stars: Gelly Roll Clear pen over Gold Metallic Gelly Roll Pen


Ingredients:
"The Night Before Christmas" Stamp from LOTV  
Red square blank
Papers from "A Christmas Carol" by Papermania
Pastel flowers and mesh net flowers from Handy Hippo  
Gems and pearls from stock
Lace border:  Martha Stewart Lace Doily Punch
Leaves: Maple Leaf  Xcut Embossing Punch
"Joy" greeting made on computer


Wednesday 13 October 2010

Leaves Are Falling All Around

I love this time of year - the leaves are turning beautiful shades of red, yellow, orange and copper brown. The shops are starting to sell Halloween and Bonfire Night goodies such as Parkin and Treacle Toffee. I have come down with a bad cold and temperature so am feeling rough.  I lose my mojo when I'm under par but managed to finish this card before I succumbed completely.  My colouring has gone like a two year old and I keep going over the lines! 


I am entering the Lili Of The Valley  No. 68 Challenge - Autumn - which entails using one of their stamps. As I only have three and they are all Christmassy, I have adapted one to look Autumny.  Not sure if it worked? 


 I am also entering the Sir Stampalot Challenge as it is Autumn Breezes, Buttons and Bows. The card depicts an autumn breeze and has a button with a delicate bow.   


Pocket Full of Posies  have a Challenge for Autumn Leaves. It does say in the rules that you have to have something floral on your card. The Happy Birthday Banner has a flower on? but not sure if that counts but will try. Last but not least Creative Stamp Friends has a Challenge for Orange Brown so I think it qualifies for that. 


 I have coloured the girl's hair gold - I know it seems strange but it just looked really nice.  I made an Easel Card which is only the second I've ever done. I struggle a bit with decorating them and think I need to be more inventive. 


I love looking at all the entries into the Challenges; they are amazing and so many different takes on one theme.  Anyway, I'm off to dose myself, meanwhile here is the card recipe:-


Recipe 
Square Easel Card
Milton Paper Stack: Orange with white daisies and Thinking Of You Paper
Lili of the Valley Stamp: "Dropping the Shopping"
Mounts: Earth Tones Glitter Paper (Handy Hippo) - Brown
Brown recycled Card (Handy Hippo)
Die Cuts from stock coloured to match and mounted
Leaf Banner: ClipArt leaves copid and pasted together
Orange Button (raided from my mum's button stash)
Gold string from stash
Two amber gems

Colouring
(Promarkers by shade and Copics by no.)
Face and legs: Vanilla and Copic R20
Hair: Gold Sakura Gel Pen
Fur Hat, Mitts, Boots Trim: Shale
Scarf: Coral, Black spots highlighted with gold
Coat: Tan
Dog: Tan, Shale for button nose
Bag: Burnt Orange, Gold Sakura Gel Pen, 
Girl's parcel: Pear Green, Shale
Dog's Parcel: Coral and Burnt Orange with Pear Green Bow.
Scarf: Tan, Black and gold spots


Challenges: 
Lili Of The Valley  Challenge 68 - Autumn
Sir Stampalot - Autumn Breezes, Button(s) and Bow(s)
Pocket Full of Posies - Challenge 8 - Autumn Leaves
Creative Stamp Friends - Challenge 9 - Orange Brown


Sharing Moments:

I came across this recipe for 100 year old Parkin - just follow the recipe and then leave for a hundred years! (only joking). The recipe is actually from October 1907 and it states that back then it sold for eight old pence a pound! I wonder how much that would be in today's money?  Amazing stuff.

I also came across this when scanning some old 35mm slides from the '60s.  It's a shame my head has been cut off but look at that grin - it's bigger than the swedes!


Tuesday 5 October 2010

First Challenge

This is my first attempt at a Challenge and is from Bev's Sketch on LOTV Challenge 67.  

Christmas Candle

The Stamp is Lily of The Valley's "Christmas Candle" and I really love it as it can be coloured in so many ways and can look totally different. It gives the card a really Christmassy glow.  I never would have thought black would work on a Christmas Card but as I have loads of black card leftover thought I would give it a go.  I think it kind of gives it an olde worlde feel? The background for the stamp was made on computer with Seashore Software. You can get a spray paint effect.  Then when dry, I stamped onto it and coloured with Copic Pens and Promarkers. I didn't have any brads so used buttons with gem on top.

Christmas Candle (detail)
Menu
Square black card blank
Red pearlised paper
Milton Christmas Papers
"Christmas Candle" Stamp by LOTV
Martha Steward Doily Edge Punch
Red and Gold Ribbon from stock
Stamp Background made on Computer/Printer
Christmas Wishes Tag made on Computer/Printer
Paper Flower coloured with Promarker Ruby, Stickled with Glitter, pearl added.
Black buttons with Red Gems stuck on top


Colours used to colour Christmas Candle Stamp:-


*Promarkers stated with shade, Copics by no. 
Face: Vanilla and Copic R20
Coat: G85
Scarf: Cool Greys 1, 2 and 4
Shoes and Mitts: Cool Grey 2
Candle Holder: Black
Candle: R46
Flame: Yellow, Bright Orange, Sakura Gelly Roll Clear Glitter Pen
Holly: Lime Green
Berries: R46
Fur on Hood/Pom Poms: Layer of Sakura Souffle White Pen and Ultra Fine Glitter Pearl


Stockists: Stamp from Lili of The Valley, Punches from Crafty Devils Papercraft.  All other from Handy Hippo.


Challenges: 
Lili Of The Valley - Challenge 67

Thursday 30 September 2010

Welcome!

Hi and Welcome,


This is my very first blog and so I am really trying to find my way around at the moment.  Here in England, autumn seems to have come upon us without warning this year.  Time to curl up with a mug of cocoa and plan new Christmas Card designs!

I have been looking at other cardmaking and scrapbooking blogs and there are some wonderfully talented designers and crafters out there.  I have also found that the more blogs I read, the more techniques I discover and so the more products I want to buy!! Do other Cardmakers and Scrapbookers get tempted as easily as me?  I have found though, that it helps if you have the right tools for the job. I still need to get a die cutter and a heat gun for embossing.  Cardmaking can be an expensive hobby but if you buy a few things each month then you can build up a nice selection of tools, papers, ribbons, embellishments etc. quite quickly.

This month I am experimenting with Promarker Pens v. Copic Pens.  I have so far always used Promarkers purely because they were the first pens I came across.  But I have seen some lovely cards done with Copic Pens and love some of the shades in their range also.  So I have today received my first Copic Pens.  I had a quick go and they seem a lot softer and more like a paintbrush.  Also I think the nib seems a bit finer at the tip which would be good to do very finework. But on both types of pens I have found the secret to doing small areas is to hold the pen vertically upright so that you only get the very tip of the nib/brush and also don't hold the pen down for too long as it may bleed over the lines.  I ordered the E00 Copic colour for skintone and it really is subtle which is nice for faces. But then I also love the Promarker Pens, they have a velvety feel when colouring. For faces, I have been using the Vanilla shade with a blob of Pastel Pink for blush on cheeks which works quite well.   I love the Promarker Brights Selection, especially the Magenta which is lovely and vibrant and cheery on a cloudy/rainy day.  Also today received my new Letraset Promarker Pen Case which is really nice. It holds 24 pens and even has velcro tabs so that you can stand the pens up ready to use and organise them as you wish. You could also store Copic Caio Pens in them and it would probably hold even more as they are thinner.  Do most people stick to one type of pen or the other?  At the moment I am using both as I'm not sure which I prefer.  Maybe I will always use both; time will tell.

I've also bought some Distress Ink, but I don't have a clue what to do with it. Eager to use it, I watched some videos and now realise that I at least need a sponge.  I have been raiding the house looking for some kind of sponge but to no avail - I hope I don't resort to my bathroom one!

My daughter gave me a cosmetic sponge she doesn't use, so I have been trying it out with the Distress Ink Brick Red. I wanted to try and create a really subtle background but it comes out very blotchy.  Seems like I will have to experiment more and watch some more videos for extra tips. So for the time being I am back to using computer software for my backgrounds. I use Seashore Software and create backgrounds with Brush that gives soft airbrush effect.  Then when dry, I stamp onto that.  It gives a nice effect.

Also this month I've also invested in a Martha Stewart Doily Edge Punch as I've wanted one for ages and thought it would look really nice on the Christmas Cards that I'm doing this year.  Hope to hear from you.

Happy Crafting!
Sue  x